
Technical information
Paving Laying Methods
Individual bedding
This method relies on each flag having a bed prepared for it individually. A bed is prepared, the flag is laid and then the next bed prepared and so on.
This method is more common used with larger flags, where handling and manoeuvrability is a major concern, with natural stone flags, where there can be differences in flag thickness between adjacent units. The flagstones should be laid directly onto to a mortar mix of 4 parts sand (class M) and 1 part cement approximately 20 – 40 mm thick. There must not be any voids under the slab.

Random thickness of natural stone flags makes screed bedding impractical
Screed Bedding
This method requires a screed bed to be prepared before placing the flags. A relatively large area can be screeded in advance and the flags placed one after the other directly onto the bed.
Whilst obviously more efficient than the individual bedding method, this method is only suitable for the smaller flags, generally those less than 600x600mm, which are small and light enough to be manhandled onto a screeded bed. It is essential that the flags be of a constant thickness, hence only the small element paving and wet-press manufactured patio flags are suitable candidates.

Regular thickness of Calibrated Brazilian flags makes screed bedding possible
Ground Preparation and sub-base
A sub-base is not normally required for a path or patio unless there is concern regarding the suitability of the sub-grade. However, any low spots can be filled with crushed hardcore, crushed stone or compacted bedding material. The surface needs to be dug off to a depth of approx. 90mm, assuming no sub-base is required. The depth of dig can be calculated as…
(average depth of flagstones + 35-50mm bed + any sub-base required)
For driveway or other heavy use, the sub-base layer is the load bearing layer. A full concrete bed (CBM4) is the best solution, combining sub-base and bedding in one and should be at least 100mm thick, minimum. For public footpaths, this may sometimes be reduced to 75mm, or increased to 150mm or more to give added protection to underground services
Individual bedding
Use a spade or large trowel to level out the bedding material, which should have the top 15-25mm loosened to allow the flag to be bedded down – this is usually achieved by ‘rippling’ the bedding surface, creating small troughs and peaks with the blade of a trowel. The bed should be 5-8mm high to allow for consolidation. Make the prepared bed spread 100mm or so further than the flag will cover – it is better to have the bed to big than too small, leaving an edge of the flag unsupported
Preparing an individual bed
Ideally, the bedding should be 25-50mm thick. Less than 25mm renders it almost impossible to settle the flag, while more than 50mm makes for uncertain compaction. Adjust the level of the sub-layers rather than use less than 25mm or more than 50mm of bedding.
Random Patterns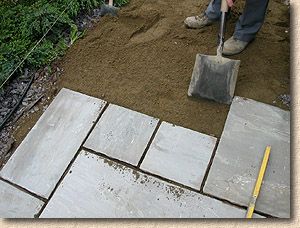
Please note for Sandstone and Travertine the random patterns may vary from those of slate. We endeavour to put more larger slabs in, as a proportion to make laying easier and reduce the number of Grout lines. Please advise if you need a particular pattern and we can quote you accordingly
Sealing
We recommend that all Sandstone, Quartzite, Travertine and Slate be sealed with an impregnator or similar. This will not only enhance colour and prevent staining, it will reduce water absorption and reduce incidence of algae growth
Pictures and advice taken from website www.pavingexpert.com
Roofing Technical section
Installation Details
Sorting slates
We recommend that the slates are sorted into at least three grades of thickness. It is extremely important that slates are sorted prior to fixing to ensure that slates in any one course are of the same thickness to prevent “kicking” slates or unsightly gaps. Whilst grading it is very important to tap each slate to ensure it is sound.
Fixing slates
Any slating work should be in accordance with the latest editions of BS5534 Part 1: 1997 and BS 8000: part 6 or with any subsequent parts/editions or standards
We advise that slate and halves be used where cutting of normal slates would result in slates with widths being narrower less than 150mm (6″) reducing the side lap and therefore the integrity of the roof.
Nails should comply with BS 1202: Part 2 Copper clout minimum shank diameter 3.35mm. Nails should be of adequate length to ensure 20 mm of penetration into the batten. The type of shank on the nail will depend on site exposure.
Hook Fixing is a common practice in Europe and suitable for all natural roofing slate. We would recommend that only this method of fixing is used for all Brazilian slates.
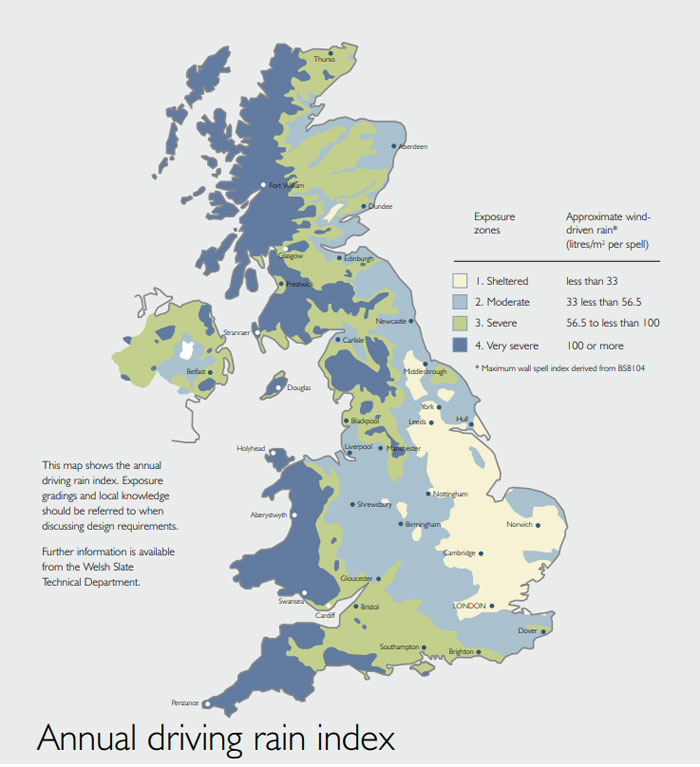
Map showing the country divided into zones on basis of wind speeds
 Batten size
50 x 25 mm for double lap slates with minimum 450 mm span recommended
Scottish Practice
Traditional Method
As above
Fixing
It is generally recognised that single head nailing is acceptable with small slates, but every third course should be double nailed.

Natural slates are individually split and individually dressed and should be treated as an individual unit when being fixed on the roof. One slate may suit a particular location on the roof better than another, perhaps for reasons of thickness, natural curvature, surface texture of appearance, therefore proper grading and selection of slates is extremely important to achieve a neat and attractive finish.
All Slate will weather to a degree and after time will show a surface difference in colour tones. When the change is slight the colour is classified as “permanent” or “unfading”. If the final results are more evident, the colours are classified as “weathering”.
Please note all green slates may be subject to slight oxidation on the surface. This does not affect the slates integrity or performance as a roofing material or the life expectancy of the slate.
Floor Slate Fixing Instructions
Floor Preparation
Concrete /Screeds/Renders
Prior to laying the slates, the concrete floor must be completely cured and dry. Allow at least 4 weeks for fresh concrete to dry before tiling. There should also be a damp proof membrane below the surface to prevent rising damp.
It is preferable if the concrete is perfectly smooth, but if it is not, then a floor levelling compound should be used prior to fixing the slates.
Timber Floors/Floorboards
Please ensure adequate ventilation beneath floors. Cover with boarding (plywood or chipboard) which must be at least 12 mm thick and be moisture resistant grade.. Secure with screws not nails at 150 mm centres. A floor primer should be applied prior to laying the tiles. In bathrooms and wet rooms cement boards such as Hardie backerboard can be used
Existing floors/Tiles
All ‘loose’ floor coverings such as vinyl, should be completely removed. Old tiles must be thoroughly scrubbed clean and all traces of grease or surface contaminants removed. Roughen surface with a sander and prime with a PVA or similar. Apply flexible adhesive whilst bonding coat is still tacky.
General Tiling Information
Tiling should commence in the corner of the room furthest from the door. As you cannot rely on walls to be straight, battening must be used to provide a straight starting point.
Using a measure and a chalked string line, mark the centre line of the room from the door to the far end. Find and mark the centre of this line.
Loose lay tiles complete with spaces from the centre point alongside the line to the far wall. Fix a straight batten to the floor at 90 degrees to the line of tiles where the edge of the last whole tile is.
Loose lay further tiles towards the corner of the room and fix another batten at 90 degrees to the first alongside the last whole tile. Check that the corner produced is exactly square, and that the positioning of neither line of tiles will result in narrow tiles having to be cut to fill in around the perimeter once the battening has been removed.
Tiling commences on the prepared corner following the instructions on the adhesive.
The final height of the floor once the slates are laid down should be borne in mind especially with respect to any doors opening over it. These doors should be removed and reduced in height accordingly.
For cutting the slates, it is recommended that a Wet tile cutter with diamond blade is used.
Laying The Slates
It is recommended that a selection of the tiles be laid out on the floor prior to fixing. This is to ensure a random mix is achieved and you do not get patches of colours on the floor.
Natural slate tiles are split by hand and therefore can vary in thickness. To lay a level floor, it is necessary to find and lay the thickest slates first and then with the adhesive, bed up all other thinner tiles so they are at the same height.
As the slate has been hand split, we will ensure there is always one “better” more smoother side, the reverse however may be rougher with chisel or grinding marks to remove excessive lumps etc. This side should always be laid on the adhesive.
It is strongly recommended that all the tiles are thoroughly cleaned/washed and allowed to completely dry prior to fixing. This is to remove any dust that may prevent the adhesive sticking to the tile.
When laying the slates, the adhesive must completely support every tile. There must be no gaps between the adhesive and slate. Every tile must be ‘fully bedded’.
Once the slates have been laid, they must not be walked upon for at least 24 hours or until the adhesive has fully set.
As the tiles are cut from a natural material the size of the tile can vary slightly. It is therefore recommended that that a grout joint of a minimum of 6-9mm is used between the tiles. The exception being calibrated tiles where a 3 mm joint is achievable.
After grouting, excess grout should be removed from the surface as quickly as possible to prevent marking.
Please note when laying slates in a random pattern it is not possible to have identical grout lines. The tiles can only be laid with slightly varying grout lines.
Internal Use – Slate laid internally must be sealed with a suitable slate sealant to protect against staining. It is recommended that the slates are sealed after fixing, and prior to grouting to make it easier to remove any excess grout. A suitable product would be LTP colour intensifier.
Prior to each coat of sealant, all tiles must be clean and dry. If the slates are not cleaned properly prior to sealing, any dirt remaining on the tile will be sealed onto the surface and extremely difficult to remove.
Expansion Joints – If your room length is greater than 10 metres in any direction an expansion joint is recommended at 8-10 metre centers in that direction. If using underfloor heating an expansion joint is recommended at 6 metre centres in both directions.
For maintenance the slates may be resealed once the sealant has visibly been worn away. There are specialist everyday floor cleaners designed to maintain the life of the slate sealants. Please contact the Sealant Manufacturer for further maintenance advice.
Underfloor heating, in the form of the electric mat system or water piped system are suited for use with slate. A flexible adhesive and grout would be required.
Laying Travertine and Limestone and fossil stone
A white adhesive should be used with lighter / translucent stones to prevent any shadowing that can sometimes occur with a grey adhesive.
It is recommended that you butter the back of the travertine tiles with adhesive to fill in any holes prior to bedding on adhesive.
The travertine tiles are packed immediately after cutting, occasionally the tiles will still be wet on delivery, this will make the tiles appear darker than their true colour. In these instances please open the crate and allow the tiles to dry completely wherein the tiles will lighten to its true colour.
The filling in travertine can occasionally become loose and fall out and the pores can grow, this must then be re-grouted to keep tidy and prevent further damage to stone.
External Use – the slates must be laid on to a base constructed from well compacted hardcore and with a minimum of 75 mm thickness of concrete. Thickness of hardcore should be at least 200 mm on clay, sandy or peat subsoil. If the tiles are to be laid alongside the house wall, the top surface must be at least 150 mm below the damp course level and the tiles must slope away from the wall.
We recommend that all the slate/sandstone/quartzite tiles be sealed with an impregnater when used externally.
To prevent staining it is recommended that the slates are sealed prior to grouting. A suitable product would be LTP Colour Intensifier.
We recommend that any travertine used outside should be sealed with a suitable sealant.
Please note: acid based cleaning products should not be used on certain slates.
google-site-verification: google1fee90b6e60d4e61.html
